20 Ways To Step Up Your Cheeseburger Game with Sous Vide Techniques
Prep time
Cook time
Total time
Thanks to the gracious folks at SousVideSupreme.com, I’ve been able to get my feet wet (pun intended) in a new realm of low-and-slow cooking with the 3-gallon sous vide water immersion oven they produce for the home cook. Sous vide or hot water bath cooking has been around for a while and it’s common among high-end restaurants and commercial food processing facilities.
Since 2009, its popularity has been growing as more and more home cooks have discovered its advantages for cooking tough cuts of meat and its season, seal, and simmer convenience. After cooking, you can refrigerate or freeze your entree, and then reheat without any loss of flavor or texture. For a brief primer on how I got my loaner, please see my previous article.
As an avid home cook, I love trying new devices and techniques on my favorite foods such as stews, seafood, barbecue meats, and exotic international dishes. I’ll be sharing the results of my personal R&D skunk works (aka humble home kitchen) beginning with this story about how I tackled a classic American favorite, the cheeseburger. There are plenty of ways to cook the ultimate cheeseburger so I’m not going to suggest that this is the best or only way to do so. Instead, my article focuses on how I was able to step up my cheeseburger game with some sous vide tricks and it is my hope that you will benefit too.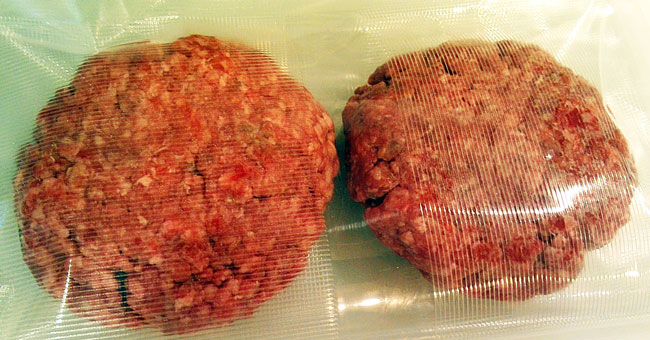
Seal your patty but don't turn on the vacuum
Specifically I used sous vide techniques on the beef patty as most aficionados would probably agree that the star of a burger is the patty. The supporting players, bun and toppings/condiments, are important but you can’t have a good cheeseburger if the patty is lackluster. So I worked on the patty and stuck to a traditional soft burger bun with plain mayo, tomato, and lettuce in my taste testings. In summary, I think the sous vide approach for the patty has several important advantages compared to the traditional methods such as hot griddle, pan searing, frying, and grilling.
Read on to find out 20 ways I found you can step up your cheeseburger game using sous vide techniques . . .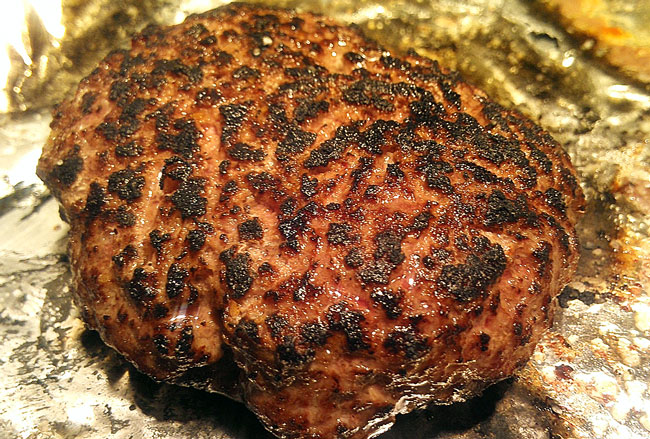 Perfectly cooked and with great crust!
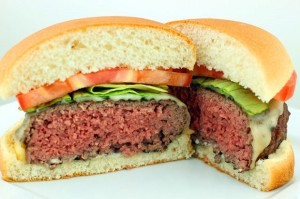
For me, the perfect burger patty should be medium-rare (130-135F), flavorful with a nice crust, and crumbly when I bite into it. I rarely order my burger medium-rare because, like you, I know that ground beef patties might have nasty pathogens hidden in them that will make me sick.
Every year the US Center for Disease Control and Prevention (CDC) estimates that 1 in 4 Americans contracts food poisoning or other foodborne diseases which are caused by over 200 bacteria, viruses, and parasites. In that list of 200 pathogens, the one with one of the highest kill temperatures is Clostridium perfringens at 125 degrees. Incidentally, this third leading cause of food borne illness originates from human and animal fecal matter. This means that your beef patty had better be heated to least 125+ degrees and held long enough to kill the little buggers. Compare that to when you eat a steak medium rare, the surface of the steak is cooked at a high enough temperature to kill the bugs.
With ground beef, the pathogens on the surface of the meat are mixed into the middle of the meat transferring the bugs into the middle of the patty. When you cook a patty to medium-rare via conventional means, the outer edges and outer parts of the patty cook first so it is very difficult to time it perfectly such that when you remove the patty from the heat that the middle is at the proper medium rare temperature of 130-135F. Often, you end up not cooking your patty long enough to kill the pathogen even if the middle is 130-135F because the kill zone is both a function of time and temperature above the kill temperature. Bottom line: you cannot cook a perfect edge-to-edge medium rare 130-135F patty and ensure you’ve conclusively killed the bad bugs without resorting to sous vide techniques.
Now that I’ve bored or fascinated you with this essential microbiology primer, let’s take a look at how my Top-20 tips on sous vide techniques can step up your cheeseburger game.
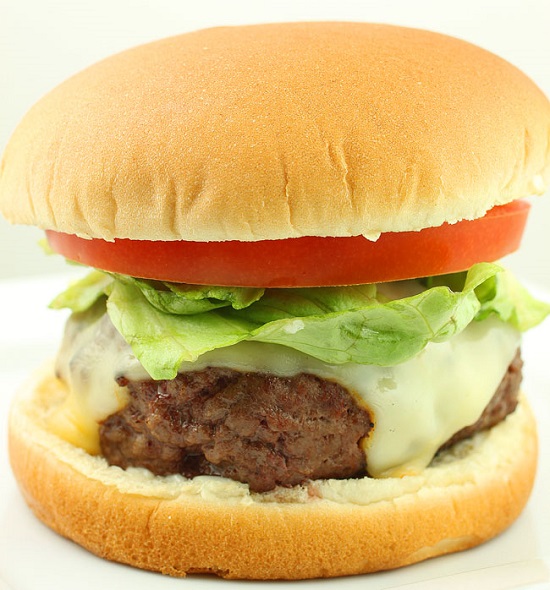
Draped with melted cheddar
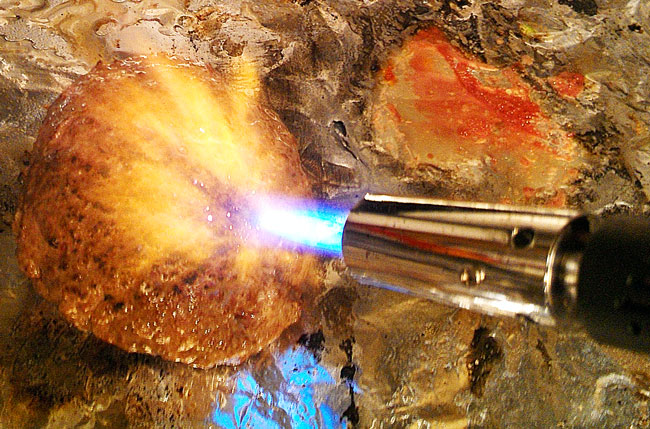
Awaken that inner pyromaniac!
Harry’s tips to properly sous vide a burger beef patty
The first thing I noticed is that after I vacuum packed my ⅓ lb patties was that the patty tasted too compacted and dense. I found it worked better when I just gently pressed all the air out and sealed the raw patty in the bag. So, don’t run the vacuum when you seal the sous vide bag. Just use the seal-setting on your vacuum unit. I kept the bag submerged and prevented it from floating up in the sous vide bath by using the supplied wire rack to weigh it down.
Sous vide cooking needs a cook with a good palate as sous vide food needs to be carefully seasoned else the results are “Meah!” I found out it was better to season it twice. Once when forming the beef patty and the second after the patty is safely cooked to medium-rare.
On the debate between pre-searing or post-searing the patty, I prefer to sear after it is cooked. The pre-seared crust will soften in the cooking bag so you have to post-sear anyway so why do it twice
Do not use lean ground beef. Go for 20-30% fat. My sous vide patties that were mixed with ground up fat from a Japanese Wagyu A-5 brisket were among the best I’ve eaten. Buy good beef. Yes, it makes a difference. I like ground chuck Choice grade or above. Remember that “Prime is Divine” Get the butcher to fresh grind if for you if you can. Freshly ground beef does taste better than the package that’s been sitting on the grocery shelf for 4 days Don’t buy pre-formed patties. Make your own using your fingers. See #9 for why Don’t overwork your patty. This is not bread. That is, don’t play too much with it by kneading or mixing it with your hands. Doing so makes the end result somewhat rubbery and lacking that crumbly mouth-feel that I think makes a good burger. The best way is to take the raw beef from the packaging and quickly form it your fingers into the size you like (4 oz, 5 oz, 6 oz)
Resist the temptation to add flavored oils, margarine, or butter in the vacuum pouch. The oils seem to suck the beef flavor out of the patty. Some oils also leave a bit of a metallic aftertaste. My attempts to use shallot oil proved to me that it’s not a good idea Go ahead and add herbs like lemon grass, kaffir lime leaves, rosemary, tarragon, garlic, etc. to the patty before you seal. I particularly liked chopped lemon grass in my tests (I have a terrific pork burger recipe to share soon)
Step it up and use a good barbecue rub to season the patty before and after cooking. A good rub is better than just salt and pepper Do cook the patty in the water bath long enough and hot enough to kill our fecal friend Clostridium perfringens. I do mine for 60 minutes @132F (more rare) or 40 minutes at 135 (more medium rare. Remember that to kill bugs, it’s both time and temperature in the kill zone.
If you don’t plan to eat right away, be sure to chill the bag quickly in a cold water bath and freeze or refrigerate right away. Do not leave the bag in the bath and turn the sous vide machine off and let it sit in the water When reheating, I’ve found it to be best to put it back into the water bath and wait until the patty gets back to 135F
Be sure to sear, fry, or char your patty after you sous vide it. The crust (Maillared reaction) is absolutely essential as the bark contains thousands of new flavor compounds and the crust gives it a nice crispy bite You can also deep fry it at 450F oil for a nice exterior texture You can broil it or finish on a very hot grill for better crust flavor. If you use a grill or broiler, a little brush of oil helps you get a good crust. Be sure your grill grates are cleaned and oiled If you are a latent pyromaniac, nothing is better than a blow torch. Personally, I love to use my crème brulee blow torch and wear a silly grin when I’m torching my patty! For added flavor and colorful flames, sprinkle coarse salt crystals when you blow torch. Watch the sparks fly! Add a couple of grinds of freshly ground black pepper after you sear for best results
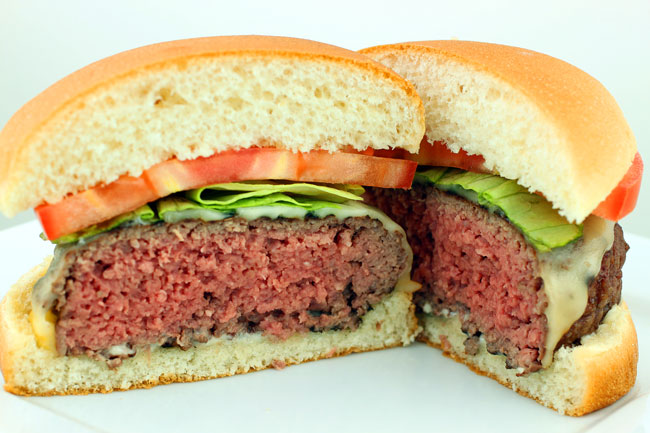
Perfect edge-to-edge medium rare Sous Vide burger
Since 2009, its popularity has been growing as more and more home cooks have discovered its advantages for cooking tough cuts of meat and its season, seal, and simmer convenience. After cooking, you can refrigerate or freeze your entree, and then reheat without any loss of flavor or texture. For a brief primer on how I got my loaner, please see my previous article.
As an avid home cook, I love trying new devices and techniques on my favorite foods such as stews, seafood, barbecue meats, and exotic international dishes. I’ll be sharing the results of my personal R&D skunk works (aka humble home kitchen) beginning with this story about how I tackled a classic American favorite, the cheeseburger. There are plenty of ways to cook the ultimate cheeseburger so I’m not going to suggest that this is the best or only way to do so. Instead, my article focuses on how I was able to step up my cheeseburger game with some sous vide tricks and it is my hope that you will benefit too.

Seal your patty but don't turn on the vacuum
Specifically I used sous vide techniques on the beef patty as most aficionados would probably agree that the star of a burger is the patty. The supporting players, bun and toppings/condiments, are important but you can’t have a good cheeseburger if the patty is lackluster. So I worked on the patty and stuck to a traditional soft burger bun with plain mayo, tomato, and lettuce in my taste testings. In summary, I think the sous vide approach for the patty has several important advantages compared to the traditional methods such as hot griddle, pan searing, frying, and grilling.
Read on to find out 20 ways I found you can step up your cheeseburger game using sous vide techniques . . .
 Perfectly cooked and with great crust!
For me, the perfect burger patty should be medium-rare (130-135F), flavorful with a nice crust, and crumbly when I bite into it. I rarely order my burger medium-rare because, like you, I know that ground beef patties might have nasty pathogens hidden in them that will make me sick.
Every year the US Center for Disease Control and Prevention (CDC) estimates that 1 in 4 Americans contracts food poisoning or other foodborne diseases which are caused by over 200 bacteria, viruses, and parasites. In that list of 200 pathogens, the one with one of the highest kill temperatures is Clostridium perfringens at 125 degrees. Incidentally, this third leading cause of food borne illness originates from human and animal fecal matter. This means that your beef patty had better be heated to least 125+ degrees and held long enough to kill the little buggers. Compare that to when you eat a steak medium rare, the surface of the steak is cooked at a high enough temperature to kill the bugs.
With ground beef, the pathogens on the surface of the meat are mixed into the middle of the meat transferring the bugs into the middle of the patty. When you cook a patty to medium-rare via conventional means, the outer edges and outer parts of the patty cook first so it is very difficult to time it perfectly such that when you remove the patty from the heat that the middle is at the proper medium rare temperature of 130-135F. Often, you end up not cooking your patty long enough to kill the pathogen even if the middle is 130-135F because the kill zone is both a function of time and temperature above the kill temperature. Bottom line: you cannot cook a perfect edge-to-edge medium rare 130-135F patty and ensure you’ve conclusively killed the bad bugs without resorting to sous vide techniques.
Now that I’ve bored or fascinated you with this essential microbiology primer, let’s take a look at how my Top-20 tips on sous vide techniques can step up your cheeseburger game.

Draped with melted cheddar

Awaken that inner pyromaniac!
Harry’s tips to properly sous vide a burger beef patty
The first thing I noticed is that after I vacuum packed my ⅓ lb patties was that the patty tasted too compacted and dense. I found it worked better when I just gently pressed all the air out and sealed the raw patty in the bag. So, don’t run the vacuum when you seal the sous vide bag. Just use the seal-setting on your vacuum unit. I kept the bag submerged and prevented it from floating up in the sous vide bath by using the supplied wire rack to weigh it down.
Sous vide cooking needs a cook with a good palate as sous vide food needs to be carefully seasoned else the results are “Meah!” I found out it was better to season it twice. Once when forming the beef patty and the second after the patty is safely cooked to medium-rare.
On the debate between pre-searing or post-searing the patty, I prefer to sear after it is cooked. The pre-seared crust will soften in the cooking bag so you have to post-sear anyway so why do it twice
Do not use lean ground beef. Go for 20-30% fat. My sous vide patties that were mixed with ground up fat from a Japanese Wagyu A-5 brisket were among the best I’ve eaten. Buy good beef. Yes, it makes a difference. I like ground chuck Choice grade or above. Remember that “Prime is Divine” Get the butcher to fresh grind if for you if you can. Freshly ground beef does taste better than the package that’s been sitting on the grocery shelf for 4 days Don’t buy pre-formed patties. Make your own using your fingers. See #9 for why Don’t overwork your patty. This is not bread. That is, don’t play too much with it by kneading or mixing it with your hands. Doing so makes the end result somewhat rubbery and lacking that crumbly mouth-feel that I think makes a good burger. The best way is to take the raw beef from the packaging and quickly form it your fingers into the size you like (4 oz, 5 oz, 6 oz)
Resist the temptation to add flavored oils, margarine, or butter in the vacuum pouch. The oils seem to suck the beef flavor out of the patty. Some oils also leave a bit of a metallic aftertaste. My attempts to use shallot oil proved to me that it’s not a good idea Go ahead and add herbs like lemon grass, kaffir lime leaves, rosemary, tarragon, garlic, etc. to the patty before you seal. I particularly liked chopped lemon grass in my tests (I have a terrific pork burger recipe to share soon)
Step it up and use a good barbecue rub to season the patty before and after cooking. A good rub is better than just salt and pepper Do cook the patty in the water bath long enough and hot enough to kill our fecal friend Clostridium perfringens. I do mine for 60 minutes @132F (more rare) or 40 minutes at 135 (more medium rare. Remember that to kill bugs, it’s both time and temperature in the kill zone.
If you don’t plan to eat right away, be sure to chill the bag quickly in a cold water bath and freeze or refrigerate right away. Do not leave the bag in the bath and turn the sous vide machine off and let it sit in the water When reheating, I’ve found it to be best to put it back into the water bath and wait until the patty gets back to 135F
Be sure to sear, fry, or char your patty after you sous vide it. The crust (Maillared reaction) is absolutely essential as the bark contains thousands of new flavor compounds and the crust gives it a nice crispy bite You can also deep fry it at 450F oil for a nice exterior texture You can broil it or finish on a very hot grill for better crust flavor. If you use a grill or broiler, a little brush of oil helps you get a good crust. Be sure your grill grates are cleaned and oiled If you are a latent pyromaniac, nothing is better than a blow torch. Personally, I love to use my crème brulee blow torch and wear a silly grin when I’m torching my patty! For added flavor and colorful flames, sprinkle coarse salt crystals when you blow torch. Watch the sparks fly! Add a couple of grinds of freshly ground black pepper after you sear for best results

Perfect edge-to-edge medium rare Sous Vide burger
Author: Harry Soo
Recipe type: Sandwiches
Cuisine: American
Serves: 3
Ingredients
- 1 lb 20-30% fat freshly ground beef chuck (makes about 3 patties)
- 1 tablespoon SYD Hot Rub or salt and pepper
- Organic green leaf lettuce
- Organic tomatoes
- Best Food Mayo
- Mustard if you like
- Pickles if you like
- Bun of your choice
Instructions
- Divide the 1lb package of ground beef into three mounds. Sprinkle some SYD Hot Rub on each mound
- Form burger patties with your hands. Do not overwork the meat
- Sprinkle some more SYD Hot Rub on the patty
- Gently place into a gallon food grade bag designed for sous vide cooking
- Gently press out all the excess air and use you vacuum sealer unit to seal the bag without turning on the vacuum setting
- Put into your Sous Vide Supreme unit (132F for 60 min or 135F for 40 mins)
- Remove and cut open the bag. At this point, you can fry, sear, grill, or blow torch the patty
- Assemble the burger with all your favorite fixings. Enjoy!
Recipe by Slap Yo' Daddy BBQ at https://www.slapyodaddybbq.com/2013/06/20-ways-to-step-up-your-cheeseburger-game-with-sous-vide-techniques/